Sahara™ Installation Instructions
AnchorDeck |
AnchorDeck PSU |
StormTread XW |
ShingleLock |
LapLock™ PSU HT
Download Sahara™ Installation Instructions
Please make sure to follow ALL specific building codes applicable to your geographical region and structure type on which product is being installed.
Deck Preparation:
- a) Deck Type - Minimum 3/8" Plywood or minimum 7/16" OSB
- b) Deck Integrity - Roof decks should be structurally sound and meet or exceed
minimum requirements of the roof deck manufacturer and local building codes. Repair and replace any damaged or rotted sections of deck before installing Sahara™ Synthetic roofing underlayment
- c) Dry Deck - Deck must be completely dry and free of moisture before installing Sahara™ synthetic roofing underlayment.
- d) Clean Deck – Make sure to remove all debris, protruding nails/staples which could potentially damage Sahara™ roofing underlayment.
Application:
Sahara™ Synthetic roofing underlayment must be installed over slopes from 2:12 and higher. Sahara™ is not recommended for slopes less than 2:12. Installation guidelines for different slopes categories are listed below:
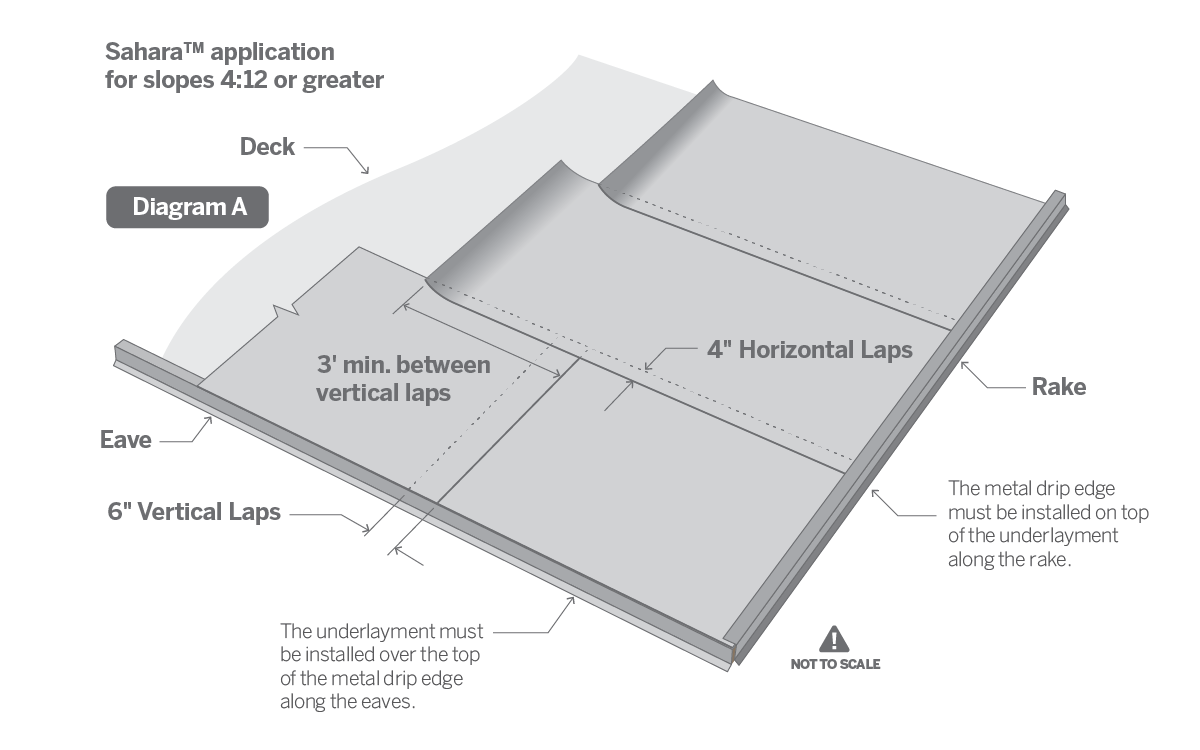
1. 1. Slopes 4:12 and more (See Diagram A)
- a) Lay out Sahara™ synthetic roofing underlayment horizontally (parallel) to the eave with the printed side up.
- b) Install Sahara™ synthetic roofing underlayment without wrinkles. Lay flat, cap nail flat. Do NOT stretch during installation.
- c) Lay Sahara™ synthetic roofing underlayment over the eave metal unless local building code requires otherwise or if Leak Barrier is in place at eaves
- d) Horizontal laps should be 4“and Vertical laps should be 6"and anchored approximately 1" in from the edge.
- e) If needed, additional fasteners may be used for same day coverage. Do not install battens directly over any cap nails. If battens are required to be installed, ensure to remove cap nail, patch the hole, then install cap outside batten field to proceed further installation steps.
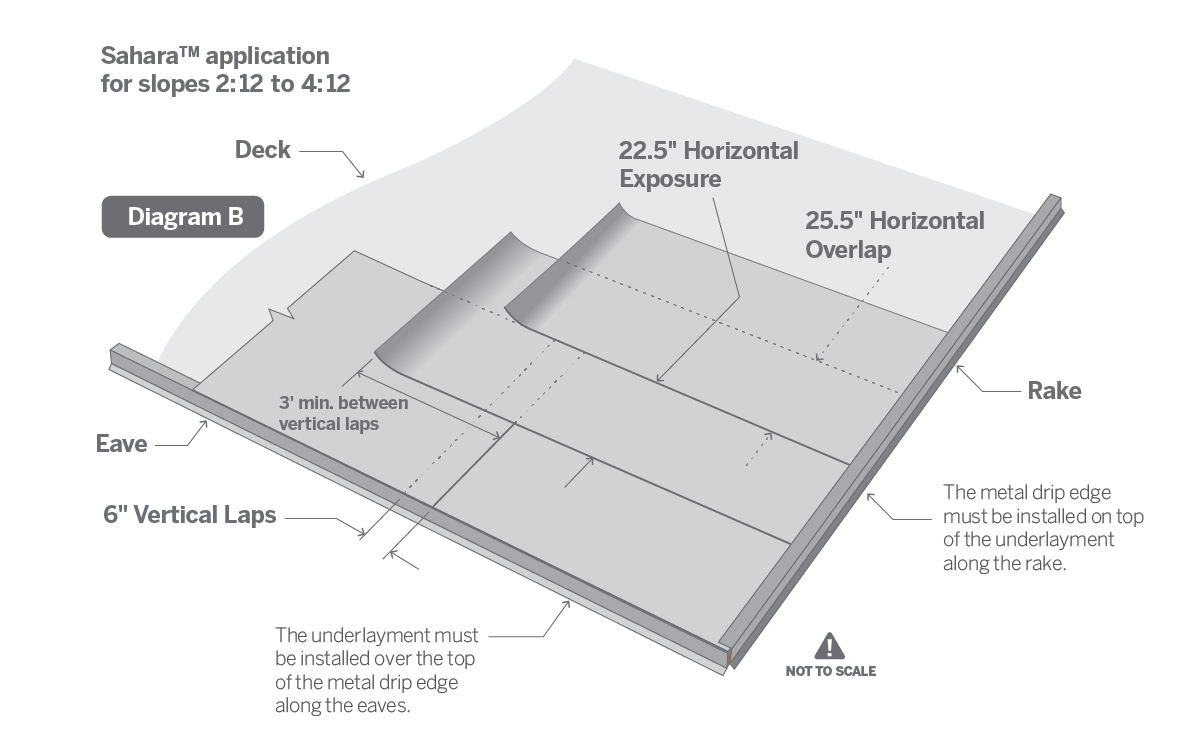
 2. Slopes between 2:12 and 4:12 (See Diagram B)
- a) Between 2:12 and 4:12 slope, it is recommended to overlap 50%
- b) Install double coverage of the product
- c) Overlap a full 25.5" over the underlying course
- d) Continue up the roof using a 22.5" exposure
- e) Overlap 6" at end lap seams and offset from adjacent end laps by 3'
 Special Installation Instructions – Exposure to High wind velocity areas
- a) Fasten side and end laps using 6" on center.
- b) Fasten in the field of the roll with two staggered rows of fasteners spaced 12" on center.
- c) Additional fasteners may be required in high wind regions per local building codes.
- d) Always apply tape over all fasteners to help prevent rain or snow from entering at the fasteners.
Primary Roof Covering Acceptance:
Sahara™ is designed for use under asphalt shingles, concrete tiles, all metal panels, synthetic shingles and primed cedar shakes.
Exposure Period:
Sahara™ must be covered by primary roofing material within 180 days of application.
Fasteners:
If Sahara™ is covered with primary roofing shingles within 24 hours, then Sahara™ can be fastened using corrosive resistant 3/8" head x 1" leg roofing nails (ring shank preferred, but smooth leg roofing nail is acceptable).
For extended exposure up to 180 days, Sahara™ must be fastened using only plastic or steel cap, corrosion-resistant nails or staples having a 1" minimum diameter cap. It is always recommended to anchor on every printed position on the roofing underlayment. Roofer must ensure that all fasteners should be driven straight and flush with the surface. The use of roofing hammer, pneumatic air or gas driven fastener tools is acceptable. The use of straight edge cutting knives is recommended.
Roofers Safety:
While installing Sahara™ synthetic roofing underlayment, roofers should make sure to always follow safe roofing practices and OSHA safety requirements. Roofers should always use and wear fall protection devices when working on roofs. Some of the examples are toe boards, rope, harnesses and rubber-soled footwear. Use caution when walking or standing on Sahara™ in wet, icy and/or dusty conditions that may reduce traction. Failure to use proper safety gear and footwear can result in serious injury.
Caution: Safety glasses should always be worn when cutting the roof with a power tool. Wear gloves when installing to avoid cuts and abrasions.